 How to mask stamps: Cute Birthday Dinos cardSeptember 30, 2021 |
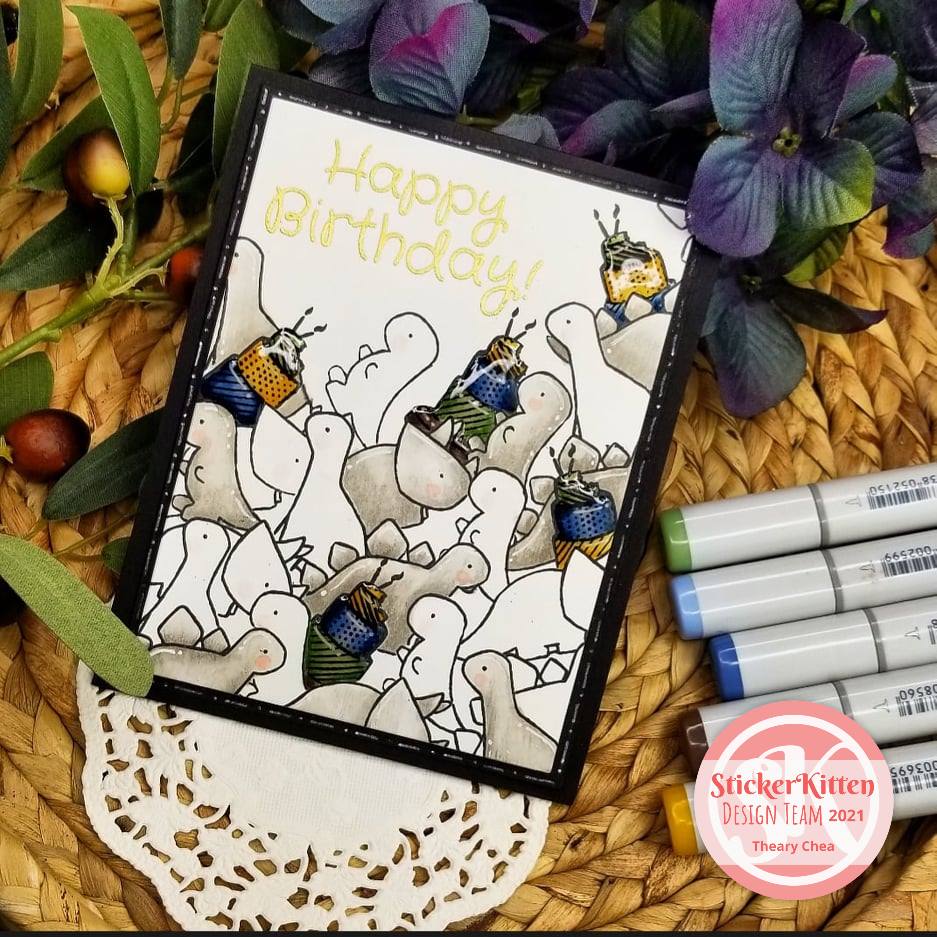
Hello crafty friends! It’s Theary here from Cloudy Coral Designs. I am so excited to be here today as a Guest Designer for Sticker Kitten. I love everything from Sticker Kitten, and this stamp set called Birthday Dinos is no exception. I created three cards to share, and today, I will be sharing the first card that I made using this lovely stamp set.
Have you heard of the masking technique in cardmaking?
It’s okay if you haven’t because this first card that I will share will give you a better idea of the technique.
To begin creating this card, I started with an alcohol-friendly cardstock in white that I cut down to 4.25 inches by 5.50 inches. I used my stamping platform to help align my stamps during the stamping process, but you can use an acrylic block if you do not have one. Starting on the bottom of the cardstock, I stamped three of the dinosaurs leaving space between each one. You want to leave room in between to allow an area for overlapping when you’re masking. After stamping on the cardstock, you will then need to stamp the images onto masking paper. If you do not have masking paper, you can use post- it papers with full adhesive on the back.
After stamping the images on masking paper, you will need to fussy cut the images. The term “fussy cutting” is used to describe the fussiness of cutting an inked image out by hand with scissors instead of using a die-cutting machine. From here, you will then match up the masking paper images with the stamped images on the white cardstock. This process will mask the bottom images from unwanted ink marks when we go back to stamping on top. What we’re trying to do here is to create layers of dinosaurs stacking on one another by masking off areas that would typically get inked on. The areas where you don’t want ink will need a mask on top, and where you want to ink will not require a mask.
Since I will be colouring the dinosaurs with alcohol-based markers, I stamped the images with alcohol- friendly ink. Which in this case, I am using Memento Tuxedo Black.
After stamping the second layer of dinosaurs, you will need to remove the mask from areas you know you will no longer need and place masks on areas you want to cover. (You might need to create additional masking dinosaurs to fill in your stamping area.) Repeat this step until your card front is near complete with stamped dinosaurs while leaving the upper left space of the card empty.
Using an anti-static powder bag, rub it on the upper left space of the card front. Applying this will help prevent any loose or unwanted embossing powder from sticking on the card front.
I placed the card front in my stamping platform and set the Happy Birthday sentiment over the area where I applied the anti-static powder. Using a clear embossing ink to ink up the sentiment, I stamped it twice on my card front to ensure that I had enough sticky ink for the embossing powder to stick on. Then using a heat gun, I applied heat onto the embossed area until the embossing powder became nice and melted.
Now, it’s time for my favourite part, colouring!
I love to colour, especially with alcohol-based markers. Using a few shades from blue, green, yellow, and grey, I gave the images a little bit of life. I also used a white gel pen to create highlights which gave the dinos more interest.
I used a rectangle die from Hero Arts to cut down the card front and applied 3D foam on the back. I then adhered it to a top folding card base in black that I cut down to 11 inches by 4.25 inches and scored at 5.50 inches.
And to end it off, I added glossy accents to the colored cakes and dinos to give the card more interest. And there you have it; the card is now complete.
I hope you found some inspiration from this card, and please don’t forget to visit me on Instagram at cloudycoraldesigns.
Until next time,
Theary Chea (Cloudy Coral Designs)